Big Tip For Memorizing Chord Tone Patterns
This lesson deals with memorizing fretboard patterns such as arpeggios and scales by creating and playing distinctive basslines and riffs.
How Do I Apply All This Theory Stuff?!
When learning new scales and arpeggios, it is easy to get stuck using box shapes and not utilise the entire fretboard. A solution to this problem is to practice scales and arpeggios in multiple positions to broaden your options when visiting any area of the bass. Below are a few alternative fingerings for some common chord types you are likely to come across and learning these will help you visualise chords across the neck and enable you to link them together. Once you are comfortable with the arpeggio fingerings, have a go at learning the bassline included to contextualise your new skills.
Chord Types
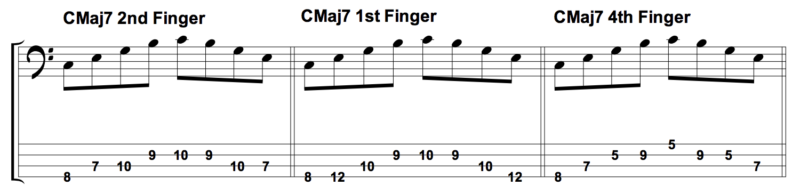
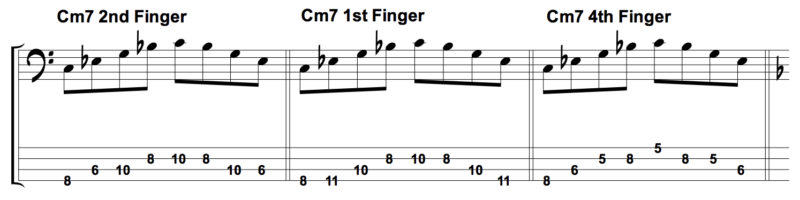
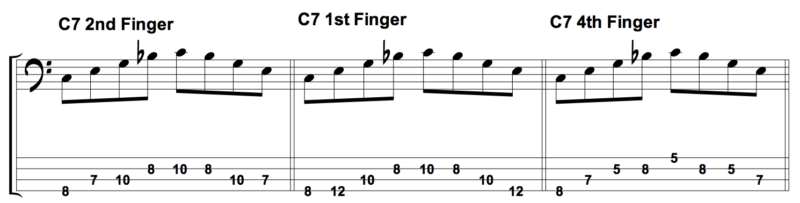
The three chords we are going to focus on in this lesson are the major 7, minor 7 and dominant 7. Take each chord individually and work through the three different shapes for each one. You will notice that they each start on a different finger – this makes the arpeggio accessible to you from any starting position.
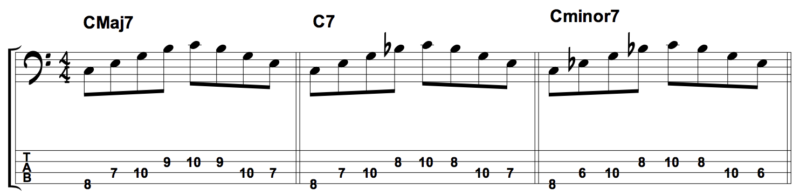
CMaj7 Patterns
C Minor 7 Patterns
C7 Patterns
What’s The Point?!
You might be asking yourself why you are learning so many patterns instead of doing something creative. The ultimate goal is to be able to play pretty much anything in one single position. Once you are fluid with these fingerings, your hand will require far less movement between chords and your playing will be much more efficient as a result.
Chord Progression Arpeggios
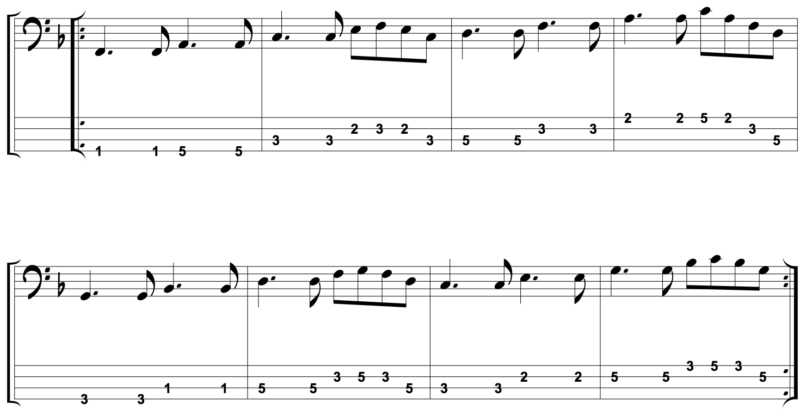
Below is a I vi ii V chord progression in the key of F major. Notice how there is no need to move your hand as the whole sequence can be played between the 1st and 5th frets.

Bassline
Lastly, have a go at this bassline using the notation and backing track below. The progression uses the same arpeggios as above and so can also be played in one position between the 1st and 5th frets. Simple basslines like this are a great way to apply any theory you learn as it combines the two most fundamental aspects of music – rhythm and harmony. Try experimenting with your own chord sequences and create a line you can play without shifting your hand. This will prepare you for writing parts in the future and will help you to always find the optimum left-hand position.

Love this lesson.. It’s so sweet to see the combination of theory and its aplication in a real world application come together in one lesson… Makes all the hard work (theory) seem more purposeful… Thanks mark awesome.
Awesome lesson . . . incredibly useful for really knowing the geography of the fret-board!
Great lesson. Very practical application of a dry topic.
Great Lesson Mark. I am looking forward to a similar lesson that incorporates 2 octaves so that we can learn how to travel up and down the neck. Also, like the new bass. I checked my crayon collection and I think the color is called cornflower? What do the lights on the pickups do?
Thanks a lot. The lights on the pickups tell you the coil setting in use. Red = Split Coil, Green = Single Coil, Blue = Dual Coil Humbucker. A little switch toggles between them. Amazing pickups. They are called Super Quads and are created by Martin Sims at the Sims Custom Shop in Kent, UK.
Mark makes it easy to learn I enjoy talking Bass Thank You Mark
Great lesson, and one of my favorite jam tracks. I know, too simple for most, but great for me, I don’t have to wonder when then chord changes; not too busy. I look forward to the arpeggios down, as you mentioned. Good advice on practice also.
Great ! Thank You !
Hi Mark, I’m Mohamed from Egypt. Incredible lesson. Thank you very much I am now able to play each chord with 3 different fingering patterns and it would be of great help specially that I want to learn to play walking bass. I will move on and purchase the intermediate course. I would be thankful if you have a course specially designed for walking bass enthusiasts.