
A funky groove that’s going to help out with many aspects of your bass playing. We’re going to work on your rhythm and how to develop subdivision accuracy, we’re going to focus on your fingerpicking and raking, and we’re even going to add a few little hammer ons into the mix.
Improve Your Groove
Groove Play Through
For this groove, we are in the Key of Ab Major as shown on the stave and TAB below. I’m going to go through this in small chunks as 16th note grooves like this can be a little tricky. If you’re not used to playing 16th note grooves then you can run the rick of quantising yourself into playing 8th notes rather than 16th’s. This is usually because it’s all too easy to focus on the notes and technique while letting the actual feel of the groove slide.
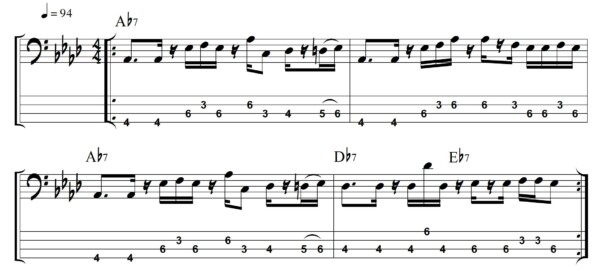
Bar 1 Breakdown
So let’s break it down and focus on our counting within each bar to really nail this pattern. You can apply this same approach to any bass line or sequence you find tricky. On beat one we see a dotted 16th note followed by a single 16th note. The dot on the downbeat means you play it for 3 x 16th’s. In other words, you play it for 1 E &, while the last 16th note is the A. Another great way of counting these rhythm is to use the Takadimi rhythm reading method. This is where instead of counting 16th’s as: 1 E & A, you count them as: Ta Ka Di Mi.
On beat 2, the down beat has a 16th note rest followed by 3 16th’s. So you don’t play the first 16th and just play the other three. In other words, you play the E & A or the Ka Di Mi of beat 2. Use your foot to tap along the four beats of the bar as your work through this bass line. On beat 2, your foot will come down as you leave that first 16th silent. It’s also helpful to clap through these rhythms to make sure you have them before playing them on the bass.
For the third beat, we have a 16th note rest followed by a 16th note and an 8th note. So just as in beat 2, we are silent on the down beat of beat 3. Here you play on the E & or Ka Di. This is a tricky rhythm to get right, especially after playing the rhythms that came before on beats 1 and 2. So really take your time with it and go as slow as your need to.
In beat 4 we have a group of 16th’s with a 16th note rest on the E or Ka. So you would play this as: 4 E & A or Ta Ka Di Mi. This kind of 16th note rhythm is seen a lot in western music, so you will begin to recognise the pattern, particularly if you are getting into sight reading. There’s a hammer on from the D to the Eb on the last 16th note of beat 4. Be sure to count it out and slowly work though this as this will greatly improve your accuracy.
Bar 2 Breakdown
For bar two, the first beat is the exact same as in bar one. The rhythm on beat 2 is the same as in bar one also, although this time we have different notes. On beat 3 we have 16th notes rests on the down beat and on the & or Di, so we are playing the off beats here. So for beat 3 we play: 3 E & A or Ta Ka Di Mi. On beat 4 we just have a simple grouping of 16th’s, it does mean however that you are playing more notes. The danger here is to speed up and rush at this point, so be sure to keep consistent time. I recommend practicing with a metronome as often as possible.
Bar 4 Breakdown
Bar three is the exact same as bar one, but in bar four we see a new rhythm on beats 3 and 4. Beats 1 and 2 have the exact same rhythm we have seen before in the other bars of this groove, but there is an octave skip added on the & or Di on beat 2. Beat 3 has the same rhythm we saw in the third bar, just with different notes. In beat 4, we see two 16th’s followed by an 8th note. This would be counted as: 4 E & A or Ta Ka Di Mi. Be mindful of your note lengths when playing this beat, as there is a temptation to choke the final note and not play it for it’s full value.
Play Through And Tips
You want to play this riff as slowly as possible while counting it out until you can feel the rhythms and how they call around your foot tap or metronome. Once you feel comfortable with the groove and notation, then you can start building up speed in small increments. Keep your fingering consistent and slow it back down if your feel starts drifting until you get it right.
This exercise is taken from the upcoming Groove Trainer Course Vol. 2, which will be available soon in the shop section at TalkingBass.net


Mark,love this riff I find it a bit of a challenge,but that’s kind of the point,can’t wait for the groove 2 course
Mark,love this riff I find it a bit of a challenge,but that’s kind of the point,can’t wait for the groove 2 course.I am sure it will be as excellent as your other courses
Is the drum track available? Does the kick drum match the bass in the first beat or is it ‘on the beat’? Thanks